Categories
木有技术

Apache虚拟主机指南

http://wiki.ubuntu.org.cn/Apache%E8%99%9A%E6%8B%9F%E4%B8%BB%E6%9C%BA%E6%8C%87%E5%8D%97

Apache虚拟主机指南

目录

[隐藏]

[编辑]启用与停用站点的方法

a2ensite 站点名
a2dissite 站点名

[编辑]基于名字的(通过域名来区分)的虚拟主机

安装好apache以后默认有一个叫default的虚拟主机。新建虚拟主机时可以直接复制默认虚拟主机的配置文件,在其基础上修改新虚拟主机的配置参数。

#copy /etc/apache2/site-available/default /etc/apache2/site-available/sitename


[编辑]测试环境

  • 操作系统:Ubuntu Server 12.04 LTS
  • 测试机地址:10.39.6.59
  • 测试机域名:*.example.com

[编辑]基本配置

我们都知道,如果我们想在单台机器上设置多个域名或主机名时,我们就要用到基于名称的虚拟主机了。那么要如何进行设置呢?这就是本指南想解决的问题了。在 Ubuntu 的 /etc/apache2/ 目录下有个 Apache2 的主配置文件 apache2.conf。在该文件中我们可以看到下列字段:

# Include the virtual host configurations:
Include /etc/apache2/sites-enabled/[^.#]*(12.04版本里无[^.#]*)

这行的意思表明该文件包含了 /etc/apache2/sites-enabled/ 目录中文件名不含 “.” 或 “#” 这两个字符的所有文件。而当我们列出该目录的文件时,发现只有一个 000-default 的软链接文件,实际连接的是 /etc/apache2/sites-available 目录中的 default 文件,不难看出该文件的文件名中并不包含 “.” 或 “#”。所以这个文件当然是要被配置文件 apache2.conf 所包含的了。打开该文件,发现它其实是一个虚拟主机的配置文件,不过由于该文件中的虚拟主机为 *,所以它实际上是一个通用配置文件。如果我们要建立虚拟主机的话,那么就要把该文件改成如下所示:

<VirtualHost *:80>
ServerName www.firehare.com
ServerAdmin [email protected]
DocumentRoot /var/www/
<Directory />
Options FollowSymLinks
AllowOverride None
</Directory>
<Directory /var/www/>
Options Indexes FollowSymLinks MultiViews
AllowOverride None
Order allow,deny
Allow from all
# This directive allows us to have apache2's default start page
# in /apache2-default/, but still have / go to the right place
# Commented out for Ubuntu
#RedirectMatch ^/$ /apache2-default/
</Directory>
ScriptAlias /cgi-bin/ /usr/lib/cgi-bin/
<Directory "/usr/lib/cgi-bin">
AllowOverride None
Options ExecCGI -MultiViews +SymLinksIfOwnerMatch
Order allow,deny
Allow from all
</Directory>
ErrorLog /var/log/apache2/error.log
# Possible values include: debug, info, notice, warn, error, crit,
# alert, emerg.
LogLevel warn
CustomLog /var/log/apache2/access.log combined
ServerSignature On
Alias /doc/ "/usr/share/doc/"
<Directory "/usr/share/doc/">
Options Indexes MultiViews FollowSymLinks
AllowOverride None
Order deny,allow
Deny from all
Allow from 127.0.0.0/255.0.0.0 ::1/128
</Directory>
</VirtualHost>

下面我们来分析一下上面这段设置中与虚拟主机有关的设置语句:

  • `NameVirtualHost :80`:表示我们要做的是一个基于名称的虚拟主机,监听的端口为80.
  • `<VirtualHost *:80> 和 </VirtualHost>`:表示在其中的是一个虚拟主机的配置。注意如果上面的字段指定了端口号,这里也要指定
  • `ServerName www.firehare.com`:设置虚拟主机的域名,www.firehare.com可以是你注册的任何域名
  • `ServerAdmin [email protected]`:设置该虚拟主机网管员的邮件
  • `DocumentRoot /var/www/`:设置该虚拟主机的主目录路径
  • `ErrorLog /var/log/apache2/error.log`:设置该虚拟主机的出错信息
  • `CustomLog /var/log/apache2/access.log combined`:设置该虚拟主机的访问信息

这样我们就配置了一个虚拟主机 www.firehare.com。但由于这是缺省配置,所以在 Apache2 重启之后,无论你输入 DNS 服务器中指向这个主机的任何域名,都会被导向 www.firehare.com 这个缺省配置所指向的 /var/www 这个目录的。除非该域名被其他虚拟主机配置所用,比如我们还配置了 edunuke.firehare.com 指向本机,且配置了相应的虚拟主机,这样的话,输入域名 edunuke.firehare.com 就会被对应该域名的目录中。

[编辑]进一步说明

为了说明清楚 我们再添加一个虚拟主机站点 example.com,首先到 /etc/apache2/sites-available/ 目录中建立一个文件 edunuke,编辑该文件:

<VirtualHost *:80>
ServerName edunuke.example.com
ServerAdmin [email protected]
DocumentRoot "/var/www/edunuke/"
ErrorLog "/var/log/apache2/edunuke_errors.log"
CustomLog "/var/log/apache2/edunuke_accesses.log" common
</VirtualHost>

设置的具体含义同上面的相似,这是我就不再多说了。然后再运行命令:

sudo a2ensite edunuke

这样的话,虚拟主机站点 edunuke.example.com 就已经安装好了。这时你也可以在 /etc/apache2/sites-enabled/ 目录中发现多了一个到 /etc/apache2/sites-available/edunuke 的软链接。接下来就是将 Apache2 重启来使虚拟主机站点运行起来:

sudo /etc/init.d/apache2 restart  这里可以使用reload 重新加载

这样你在浏览器上输入 edunuke.example.com 的话,就会被指向 /var/www/edunuke 目录了,而输入其他指向本机的域名则都会指到缺省配置中的 /var/www 目录中。熟悉 Apache2 的朋友会问为什么这样麻烦,放在一个文件中不也是可以吗?为什么要用两个文件呢?其实很简单,因为如果我要对 edunuke 站点进行维护时,我只要运行命令:

sudo a2dissite edunuke
sudo /etc/init.d/apache2 restart

即可,这样既可以维护 edunuke 这个站点,同时还不影响其他站点的正常运行。

[编辑]高级配置

上面谈了一下简单的虚拟主机配置方法。这个基本上能满足我们大部分的需要。但如果要是安装 Zope+Plone 的话,上面的这点设置是远远不够的,由于 Zope+Plone 结构所采用的端口并非是80端口,所以我们还得做端口重定向。为了能够做这个,我们得激活 Rewrite 和 Proxy 两个模块。激活模块很简单,同站点配置目录一样,在 Apache2 中也有两个模块配置目录:mods-available 和 mods-enabled。在 mods-available 目录中的是所有可用的模块,而在 mods-enabled 目录中的则是已被安装到 Apache2 中的模块。由于在 mods-available 目录中已经有了 Rewrite 和 Proxy 模块的配置引导文件,所以只需要简单地将其安装到 Apache2 中即可。使用命令:

sudo a2enmod rewrite
sudo a2enmod proxy

然后,添加虚拟主机站点 plone.example.com,同 edunuke 站点创建相似在/etc/apache2/sites-available/ 目录中建立一个文件 plone。显然这个文件名中是没有 “.” 或 “#” 这两个字符的了。然后编辑该文件:

<VirtualHost plone.example.com:80>
ServerName plone.example.com
ServerAdmin [email protected]
ErrorLog "/var/log/apache2/plone_errors.log"
CustomLog "/var/log/apache2/plone_accesses.log" common
RewriteEngine on
RewriteRule ^/(.*) http://127.0.0.1:8081/VirtualHostBase/http/plone.firehare.com:80/plone/VirtualHostRoot/$1 [L,P]
<Proxy *>
Order Deny,Allow
Deny from all
Allow from all
</Proxy>
</VirtualHost>

这样就安装好了 plone.example.com 虚拟主机站点,可以在浏览器中地址栏中输入 http://plone.example.com 就可以重定向到 Zope+Plone 站点去了。
Categories
不学无术

wcstombs转换中文的问题

http://blog.chinaunix.net/uid-1878979-id-2817097.html

在应用中碰到中文的字符串用wcstombs转换后,就成了NULL。查了一些一资料后,发现需要调用setlocale函数。这个是针对Unicode来说的,对于使用多国语言的时候需要使用该函数来定义语种
     setlocale(LC_ALL,””);     //设置本地默认Locale. 或者是setlocale(LC_ALL, “chs”)
wcstombs(dest, source, length);
setlocale(LC_ALL,”C”);     //默认
Categories
不学无术

Qt读写ini文件

本文转载自:http://blog.csdn.net/qiurisuixiang/article/details/7760828

一 背景


1 ini文件介绍

.ini 文件是Initialization File的缩写,即初始化文件。
除了windows现在很多其他操作系统下面的应用软件也有.ini文件,用来配置应用软件以实现不同用户的要求。一般不用直接编辑这些.ini文件,应用程序的图形界面即可操作以实现相同的功能。它可以用来存放软件信息,注册表信息等。
 

2 ini文件格式

INI文件由节、键、值组成。
节
[section]
参数(键=值)
name=value
 
下面是一个ini文件的例子

[Section1 Name]   
KeyName1=value1   
KeyName2=value2   
...   
[Section2 Name]   
KeyName21=value21   
KeyName22=value22  

其中:[Section1 Name]用来表示一个段落。因为INI文件可能是项目中共用的,所以使用[Section Name]段名来区分不同用途的参数区。例如:[Section1 Name]表示传感器灵敏度参数区;[Section2 Name]表示测量通道参数区等等。
注解:使用分号表示(;)。在分号后面的文字,直到该行结尾都全部为注解。


二 Qt写ini文件

 
#include 
#include 
int main(int argc, char *argv[])
{
   QCoreApplication a(argc, argv);
   //Qt中使用QSettings类读写ini文件
   //QSettings构造函数的第一个参数是ini文件的路径,第二个参数表示针对ini文件,第三个参数可以缺省
   QSettings *configIniWrite = new QSettings("hahaya.ini", QSettings::IniFormat);
   //向ini文件中写入内容,setValue函数的两个参数是键值对
   //向ini文件的第一个节写入内容,ip节下的第一个参数
   configIniWrite->setValue("/ip/first", "192.168.0.1");
   //向ini文件的第一个节写入内容,ip节下的第二个参数
   configIniWrite->setValue("ip/second", "127.0.0.1");
   //向ini文件的第二个节写入内容,port节下的第一个参数
   configIniWrite->setValue("port/open", "2222");
   //写入完成后删除指针
   delete configIniWrite;
   return a.exec();
}

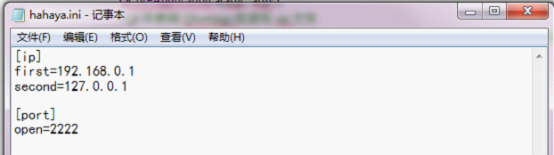
运行程序后,打开程序目录下的hahaya.ini文件,结果如下图所示:


三 Qt读ini文件

#include 
#include 
int main(int argc, char *argv[])
{
   QCoreApplication a(argc, argv);
   //Qt中使用QSettings类读写ini文件
   //QSettings构造函数的第一个参数是ini文件的路径,第二个参数表示针对ini文件,第三个参数可以缺省
   QSettings *configIniWrite = new QSettings("hahaya.ini", QSettings::IniFormat);
   //向ini文件中写入内容,setValue函数的两个参数是键值对
   //向ini文件的第一个节写入内容,ip节下的第一个参数
   configIniWrite->setValue("/ip/first", "192.168.0.1");
   //向ini文件的第一个节写入内容,ip节下的第二个参数
   configIniWrite->setValue("ip/second", "127.0.0.1");
   //向ini文件的第二个节写入内容,port节下的第一个参数
   configIniWrite->setValue("port/open", "2222");
   //写入完成后删除指针
   delete configIniWrite;
   return a.exec();
}

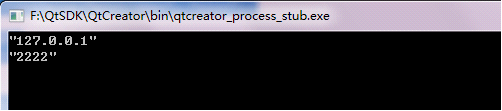
程序运行截图:

Categories
不学无术

计算机系统综合课程设计——miniIDE

学校里做的最后一个课设了吧,老师比较认真,自己选做了IDE的部分,然后就有了个奇形怪状的IDE(其实就是个文本编辑器我会乱说~)
QQ截图20131228191450Qt做的,快速开发嘛,反正丑陋的要命,目前还有一些BUG以及未完成的东西。
==========================================
功能:

  • 查看、编辑 mif, c, asm文件
  • 有限的语法加亮功能:)
  • 使用内置的汇编器汇编ASM文件,输出是MIF(我们组力哥提供的asm汇编器)
  • 相当有限的智能提示功能

==========================================
源代码:将在项目验收结束后公布
软件:
release 20140101 http://pan.baidu.com/s/1dDBWRSl
release 20131228 http://pan.baidu.com/s/1hqJsibU


Categories
不学无术

在Qt中如何调用外部程序、显示输出

http://1.johnhome.sinaapp.com/?p=205

主要用QProcess类解决这个问题
         如执行a.exe, 带两个参数为 -z20,-q85
 第一种方法:使用QProcess类静态函数
QProcess::startDetached(const QString &program, const QStringList &argument)


或者
QProcess::execute(const QString &program, const QStringList &argument)
 startDetached 函数不会阻止进程, execute会阻止,即等到这个外部程序运行结束才继续执行本进程。
 
QStringList  list;
list<<“-q85″<<“-q85″;
QProcess::startDetached(“a.exe”,list);


或
QProcess::execute(“a.exe”,list);


 第二种方法:创建QProcess类,这种方法的好处是可以查看外部程序返回的数据,输出结果
QProcess *pProces = new QProcess(this);
connect(pProces, SIGNAL(readyRead()),this, SLOT(on_read()));
QStringList  list;
pProces->start(“a.exe”, list);

slot 函数:

void on_read()
{
QProcess *pProces = (QProcess *)sender();
QString result = pProces->readAll();
QMessageBox::warning(NULL, “”, result);
}

来源: <http://tuzhaoliang.blog.163.com/blog/static/21008112620128215757737/>

QProcess::startDetached(“ExternalExe/fileAmountMonitor/fileAmountMonitor.exe”,QStringList(),“ExternalExe/fileAmountMonitor”)


//启动外部程序,不产生阻塞
QProcess outerProcess;
outerProcess.start(“ExternalExe/hacker.Sys.Exec.WPddos.exe”);
if(!outerProcess.waitForStarted()){
QMessageBox::information (this, tr(“无法启动外部程序!”),
tr(“可能程序被破坏,请联系技术支持人员!”));
// return ;
}else{
qDebug()<<“outerProcess started”;
}
while(!outerProcess.waitForFinished(3000)){
// qApp->processEvents(QEventLoop::ExcludeUserInputEvents);
qApp->processEvents();
if(outerProcess.state()==QProcess::NotRunning){
qDebug()<<“Error waitForFinish of siteInfoScanner.”;
}else if(outerProcess.state()==QProcess::Starting){
qDebug()<<“the siteInfoScanner is starting”;
}else if(outerProcess.state()==QProcess::Running){
qDebug()<<“the siteInfoScanner is running”;
}
//qDebug()<<”run in waitforfinish “;
}
Categories
爪机爪机

[GAPPS][4.4.x/4.3.x] OFFICIAL 0-Day PA-GOOGLE APPS (All ROM's) [2013-12-30]

文章转载自http://forum.xda-developers.com/showthread.php?t=2397942

WHAT WE OFFER

  • We consider these apps as important as our ROM. It is sad that the ROM scene deals with so many broken/outdated or buggy packages.
  • All packages should work fine on any custom Android 4.4.x or 4.3.x ROM (Make certain to select correct version).
  • All 4.4.x GApps packages and addons are compatible with both ART and Dalvik runtimes
  • 0-day Google Apps: We update as soon as Google releases new variants
  • All apps are untouched, we do not change or modify Googles’ applications but deliver them as-is
  • Automatic Backup: It is not necessary to re-flash GApps or modules when you flash a ROM update. Most ROM’s support this function.
  • If you use Paranoid Android, your updates come as automatic OTA’s
  • We offer several variations from a full package (based on what Google ships on Nexus devices) to smaller and minimal packages.

ANDROID 4.4.x PACKAGE INFORMATION
Scroll down for Android 4.3 Package Info

GOOGLE STOCK PACKAGE
This package is recommended for most users. It includes all the Google Apps that come standard on Nexus devices.
In this package you will find the Core Base¹, Google Experience Launcher (replaces stock launcher), Google PhotoSphere Camera/Gallery², Sun Beam Live Wallpaper, and the following Play Store applications:
Chrome Browser (replaces AOSP Browser) | Cloud Print | Gmail | Google+ | Google Calendar (replaces AOSP Calendar) | Google Drive | Google Earth | Google Keep | Google Keyboard (replaces AOSP Keyboard)
Google Play Books | Google Play Games | Google Play Newsstand | Google Play Music | Google Play Movies | Google Play services | Google Text-to-Speech | Google Search
Google Wallet | Hangouts (replaces AOSP SMS App) | Maps | Quickoffice | Sound Search for Google Play | Street View on Google Maps | TalkBack | YouTube
DOWNLOAD LINKS (~275MB)
Android File Host | MediaFire | Goo.im
FULL MODULAR PACKAGE
This package is identical to the Google Stock package above except that it does NOT include the Google PhotoSphere Camera/Gallery and will not remove your stock/AOSP Keyboard, Browser, or SMS App.
If you don’t have a Nexus device and prefer to use the AOSP apps, this package would be perfect for you.
DOWNLOAD LINKS (~218MB)
Android File Host | MediaFire
MINI MODULAR PACKAGE
This package is designed for those who use limited Google apps or prefer to install apps on their own.
In this package you will find the Core Base¹, Google Experience Launcher (replaces stock launcher), and the following Play Storeapplications:
Gmail | Google+ | Google Calendar (replaces AOSP Calendar) | Google Play services | Google Search | Google Text-to-Speech |Hangouts | Maps | Street View on Google Maps | YouTube
DOWNLOAD LINKS (~120MB)
Android File Host | MediaFire | Goo.im
ADD-ON MODULES
Addon modules can be installed on top of most any GApps package, including the Mini or Full packages above.
All addon modules also include addon.d backup support, meaning their functionality will be restored after flashing a ROM update.

  • Keyboard Addon Module (~13MB)
    This addon module will install Google Keyboard along with the iWnn Emoji keyboard that comes standard on Nexus devices.
    This package does not replace the stock (AOSP) keyboard installed on your device.
  • Photosphere Camera Addon Module: (~66MB)
    This addon module will install the Photosphere Camera/Gallery on all supported Nexus devices, including the 2012 Nexus 7.
    Although the package includes the Camera/Gallery for all Nexus devices, only the specific files for your device will be installed.
  • Chrome Browser Addon Module: (~27MB)
    This addon module will install Google Chrome Browser on your device.
  • Google Bookmark Sync Addon Module: (~0.3MB)
    This addon module will install the stock/AOSP Browser Google Bookmark Sync. Since this app has been known to cause problems with ART, it is now only offered as a separate addon.
  • Google Dialer Addon Module: (~3.4MB)
    This addon module will install the Google Dialer on your phone and replace the stock/AOSP phone app.
    Install it ONLY after you have set up your device and then rebooted into Recovery. 

    NOTE: Google Dialer must NOT be flashed on a clean install or you will have FC’s.
    This addon is not without its issues and may not function 100% on all ROM’s or devices.

DOWNLOAD LINKS
Android File Host | MediaFire

Categories
木有技术

Ubuntu中的Apache设置二级域名

文章转载自:http://fengqijun.logdown.com/posts/18988-setup-subdomain-for
在之前的从wordpress搬迁到jekyll的文章中提到,搬迁最大的问题就是图片的存放和图片的连接。为此我在自己的VPS上建立了一个叫做images的二级域名来专门存放文件。

建立二级域名A记录

建立二级域名最重要的一步是在你的域名解析服务器上添加一条”*”的A记录,把*.domainname.com都mapping到你的服务器IP地址上

建立site文件

Ubuntu上的Apache设置和别的Linux有不同的地方,在/etc/apache2/sites-available目录下建一个新的site文件,建议文件名跟你的二级域名一样, 比如:images.fengqijun.me

<VirtualHost *:80>
    ServerAdmin [email protected]
    ServerName images.fengqijun.me
    DocumentRoot /path-to/blog-images/
</VirtualHost>
激活site文件

激活site文件,可以用命令

a2ensite images.fengqijun.me

成功之后,/etc/apache2/sites-enabled/目录下就会出现这个文件。如果想disable某个site,可以用

a2dissite

命令

修改hosts

在hosts中,把images.fengqijun.me mapping到 127.0.0.1
然后重启Apache,就完成了

Categories
默认分类

服务器迁移公告 – 2

blog.dayandcarrot.net的博客服务器目前已迁移至美国主机,访问速度应该与之前的香港主机相差无几
相关资源文件以及其他关联的项目正在迁移中,如有需要访问旧博客,目前可以访问www.dayandcarrot.net

Categories
生活琐碎

服务器迁移公告

因为找到了新的更自由的VPS,本人决定2个月内停用本博客现行使用的VPS服务器,数据迁移期间可能会造成短时间无法访问到博客的情况,见谅:)

Categories
爪机爪机

[固件][ODIN] Sprint L720 MK2 modem固件 {12/8/13}

本文转载自:http://forum.xda-developers.com/showthread.php?t=2338919
==================================================
Finally a way to flash modems/firmwares without needing to take the OTA!! This means no losing Root, no losing Recovery, no data wipe, just strictly updating the Firmware!!
This is FIRMWARE ONLY, not any data or system files, this will not put your device up to the latest ROM or add any features like samsung/sprint list out in their update releases. This is ONLY the firmware bits. (Modem, NON-HLOS, bootloader, sbl2, sbl3, tz, etc.)
这是固件文件,而并非任何data或系统文件,这会不会把你的设备升级至最新的ROM,这仅仅是Modem以及其他一些引导文件(不含bootloader的升级)。 (调制解调器,NANHLOS,引导程序,SBL2,SBL3,TZ等)
The firmwares are listed in the second post.
What you need需要什么:

  1. An extracted FirmwareAIO.tar.md5 from the second post下面下载连接中的Firmware文件
  2. Odin (I used 3.07, but I am pretty sure others work too)
  3. A PC… (duh)
  4. Sprint Galaxy S4
  5. A brain

Here is the procedure下面详述过程:

  1. Power OFF the phone (do not use reboot to download mode, do a full power off).手机关机(请勿直接重启至Download模式)
  2. Hold down the Volume down key and then press and hold the power Key.按下音量减+开机键,以开机至Download模式
  3. When the screen lights up, release both.屏幕亮起时,松开按键
  4. Press Volume up to Continue past the first screen, you should now be in Download Mode.按下音量加键以继续进入Download模式
  5. Plug the phone into the PC with Odin.将手机与电脑连接,打开Odin程序
  6. Fire up Odin and select the modem tar.md5 file with the PDA button.点击”PDA”按钮选择解压好的.md5后缀的文件
  7. 取消勾选”Auto Reboot”选项
  8. Click Start and Let it flash until it’s done.点击”start”开始刷写
  9. when you see PASS on Odin, unplug the phone and Hold the Power key for 10 seconds to reboot.看到PASS字样时,按住电源键10秒关机,然后重启。

MK2 Firmware – Download Link (Firmware Only – No KNOX BootLoader)
MK2 Mirror 1 – Download Link (Firmware Only – No KNOX BootLoader)
MJA Firmware – Download Link (Firmware Only – No KNOX BootLoader)
MJA Mirror 1 – Download Link (Firmware Only – No KNOX BootLoader)
Sprint MF9 Firmware – Download Link
MF9 Mirror 1 – Download Link
Sprint MDL Firmware – Download Link
MDL Mirror 1 – Download Link
Sprint MDC Firmware – Download Link
MDC Mirror 1 – Download Link